LinkedIn Profile Photo Dimensions: Size, Crop, Export
LinkedIn profile photo dimensions that reliably look sharp start with a square image exported at 400×400 pixels (or larger, then resized cleanly), kept under LinkedIn’s file-size limit, and framed for a circular crop. Use a centered safe-area rule so your eyes, chin, and hairline stay inside the circle. The payoff is a headshot that stays crisp across devices.
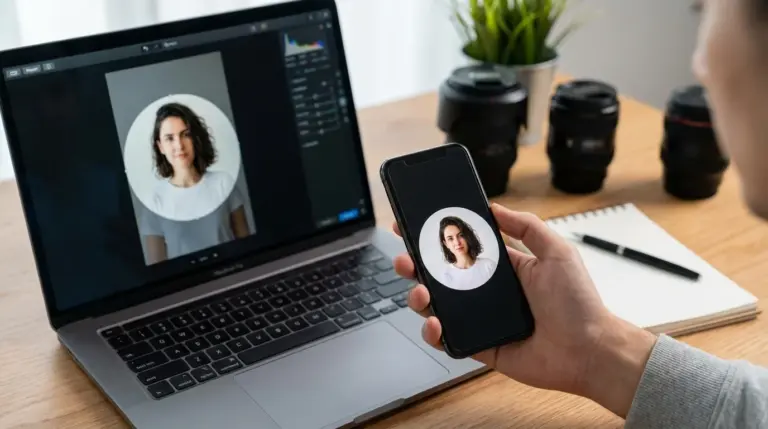
Imagine this scenario: you upload a beautiful, high-resolution portrait, and the moment it lands on your profile, your forehead looks clipped and your skin turns mushy. Your camera didn’t fail, and your photographer didn’t either. The upload pipeline did what it always does: it resized, recompressed, and forced your rectangle into a circle.
That’s exactly what happened to a lot of people who start with a tall, multi‑megabyte file and assume “bigger is always better.” LinkedIn will display your photo small, but it still needs a file that’s shaped and exported to survive compression. The guide gives you a measurable circular safe-area rule, an export matrix that prevents common artifacts, and a symptom-to-fix workflow you can repeat every time.
What are the current LinkedIn profile photo size and file requirements?
LinkedIn profile photo size requirements boil down to three variables you control: pixel dimensions, file format, and file size. When those three fit within LinkedIn’s limits, your image stays sharper and your crop stays predictable.
Use this as your working target: export a square image at 400×400 pixels and keep it comfortably under the linkedin profile photo file size limit shown in LinkedIn’s Help Center. People often search for “linkedin profile picture size 400×400” for a reason: it’s a practical sweet spot that looks clean on desktop and mobile while keeping file size manageable.
Specs can change, so treat them as versioned, not timeless. Before you publish a final headshot (or before your team standardizes a workflow), open LinkedIn’s Help Center article for profile photo uploads, confirm the current minimum pixel dimensions and the current maximum file size, and record it in your draft notes like this:
- LinkedIn Help Center verification date: __________ (YYYY‑MM‑DD)
- Minimum dimensions (confirmed): __________
- Maximum file size (confirmed): __________
If you’re updating an existing photo, do a fast audit before you touch anything: check whether the image is square, check its pixel size, and check its file size. When you see a tiny image (under the minimum) or a massive file exported from a camera original, you can predict the failure mode before you upload.
One practical rule that keeps you out of trouble: don’t upload a full-resolution camera file unless you know exactly how it will be resized. Export a clean square at your target size instead, and you’ll control the quality loss rather than letting the platform decide.
How does LinkedIn’s circular crop work (and what is the safe area)?
LinkedIn’s circular crop is a mask placed over a square image, which means corners disappear and anything near the edges can get clipped on different screens. The safest approach is to design your framing for a circle, not for the full square.
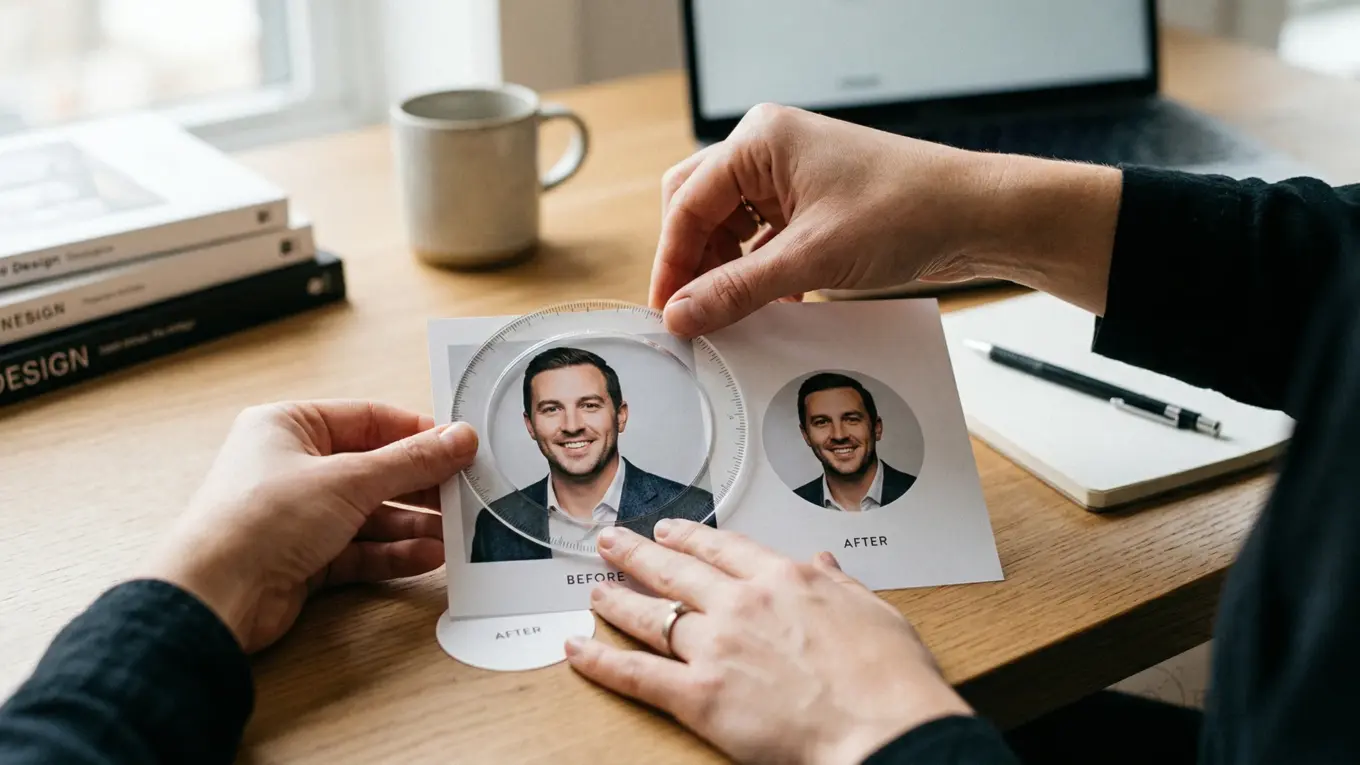
Use a measurable safe-area rule you can apply in any editor: start with a square s, then imagine a circle inside it. Keep every “must-not-cut” feature (both eyes, eyebrows, full chin line, and the top of your hairline) inside a centered safe zone that’s about 80% of the square’s width and height. In plain terms, leave a margin of about 10% on each side as “throwaway area” that might vanish in the circular crop.
Here’s a simple before/after framing example you can replicate using the same source photo:
- Before (risky): eyes near the top edge, chin near the bottom edge, shoulders wide. The circle eats forehead or chin, and your face looks smaller than it should.
- After (safe): eyes sit roughly in the upper half of the frame, your chin has breathing room, and your face occupies most of the circle without touching the edge.
If you need a quick way to preview a circular photo crop before uploading, you can use a simple circle crop tool to see what the circle will keep and what it will discard. Treat it as a check, not as a replacement for correct resizing.
This safe-area approach is the decision framework that most “specs-only” posts skip: it turns a vague suggestion like “don’t crop too tight” into a repeatable layout rule. When you follow it, you stop losing hairlines, ears, and chin contours to the mask.
What’s the best file format for a LinkedIn profile photo (JPEG vs PNG)?
The best file format for a LinkedIn headshot depends on what’s inside your image. JPEG is usually the right choice for a photographic headshot, while PNG earns its place when you have sharp edges, text overlays, or a background you need to keep perfectly clean.
JPEG compresses continuous-tone photos efficiently, which keeps file sizes lower for portraits. PNG is lossless for the saved file, which can preserve crisp edges and avoid blocky artifacts in some edits, but it often produces larger files. A clear, practical overview of these trade-offs lives in MDN’s image format guide, and it’s a good reference when you’re choosing between formats for a specific use case.
Even if you use modern web formats in your workflow, you’ll often still export JPEG or PNG for LinkedIn compatibility and simplicity. WebP is a strong format for web delivery, with good compression and optional transparency, as outlined in Google’s WebP overview. For LinkedIn profile photos, treat WebP as an internal working format only if your tools prefer it, then export a final JPEG or PNG that matches the upload rules. Use this export matrix to make the choice based on risk, not on preference:
| Photo type | Best export | Suggested setting | Artifact risk to watch | Skip this when… |
|---|---|---|---|---|
| Standard headshot (natural background) | JPEG | High quality (about 80–90 on most sliders) | Blockiness in skin tones if over-compressed | There’s sharp text or a graphic edge you can’t soften |
| Headshot with a flat studio backdrop (solid color) | PNG or high-quality JPEG | PNG when file size stays under the limit | Banding in gradients if JPEG is too aggressive | PNG pushes you over the max file size |
| Graphic avatar (illustration, logo-like edges) | PNG | Export at 400×400, then verify file size | Halos on edges if recompressed later | LinkedIn rules require a real photo for your profile in many contexts |
| Background-removed portrait on a clean solid color | PNG | Keep edges clean; avoid heavy sharpening | Dirty edge fringing around hair | You can’t keep the PNG under the file-size limit |
The recommendation is simple: pick JPEG for most headshots, pick PNG when edges and flat colors matter. The disqualifier is equally simple: don’t pick PNG if it forces you to exceed the upload limit and triggers heavy recompression.
How do you export a LinkedIn-ready headshot without blur or compression artifacts?
A LinkedIn-ready export is a controlled resize plus a controlled save, done in the right order. If you resize after you compress, you magnify artifacts. If you compress after you oversharpen, you get halos.
Follow this sequence every time, whether you’re using Apple Preview, Windows Photos, Affinity Photo, Lightroom, or a phone editor:
- Start from a clean source image with your face in focus.
- Crop to a 1:1 square using the safe-area rule, not the edge of your original frame.
- Resize to your target (commonly 400×400) using a high-quality resizing option in your editor.
- Export as JPEG (high quality) or PNG (only if it stays under the limit).
- Check file size and re-export if needed, changing compression before changing dimensions.
If you’re working from a very large file and your editor only offers “quick resize,” use a tool that gives predictable output settings. For batch workflows or consistent exports across a team, the documentation for Sharp’s output options shows how professional pipelines define format and quality reliably. You don’t need to be a developer to benefit from the concept: the key is consistent, explicit output settings, not “save for web” guesswork. Two practical examples help you see the difference:
- Example A (desktop): You edit a headshot in Affinity Photo, crop it square with a little headroom, resize it to 400×400, and export a high-quality JPEG. The result stays crisp because you controlled the resize and avoided excessive compression.
- Example B (phone): You take a portrait in iPhone Portrait mode, then crop it to square and export it directly from Photos. It can still work well, but you’ll need to double-check the circular safe area because phone editors often default to tight face crops.
If your export ends up larger than LinkedIn allows, reduce file size by adjusting compression first rather than shrinking below a clean minimum. When you need a fast, no-drama reduction that keeps detail, an online image compressor can get you under the limit without changing your framing.

Why does my LinkedIn profile photo look blurry after uploading (and how do I fix it)?
Blurry uploads usually come from a mismatch between your file and LinkedIn’s processing: the platform resizes it in a way you didn’t control, or it recompresses it because the file is too large, or the source is too small and gets stretched.
Fixes work best when you diagnose by symptom, not by guesswork. Use this troubleshooting table and apply the smallest corrective action that matches what you see:
| What you see | Likely cause | Specific fix |
|---|---|---|
| Soft, “mushy” face detail | Uploaded file was huge; LinkedIn recompressed | Export a square at 400×400 (or a clean higher square if you prefer), then export JPEG at high quality; re-upload |
| Pixelated edges and blocky detail | Source image is below LinkedIn’s minimum size | Start from a higher-resolution original; avoid screenshots; if you only have a small file, re-shoot or use a higher-quality source |
| Forehead, chin, or hair clipped | Crop ignored the circle; face sits too close to the edge | Re-crop using the 10% margin safe-area rule; keep key features inside the centered safe zone |
| Background looks dirty or “ringed” near hair | Over-sharpening or heavy compression around edges | Reduce sharpening, export PNG if file size allows, or export a higher-quality JPEG; avoid aggressive noise reduction |
| Colors look washed out | Color profile or export mismatch | Export in a standard color space your editor supports (commonly sRGB), then re-upload and compare on another device |
The result was surprising for many people the first time they do it right: a smaller, correctly exported file can look sharper than the original camera file once it’s on LinkedIn. That’s not magic; it’s control. You chose the resize method, you chose the format, and you stopped the platform from making those decisions for you.
If you want deeper background control for professional portraits, learn the practical trade-offs in a focused guide on background remover apps for photography. It’ll help you avoid the “dirty edge” look that shows up when a cutout meets LinkedIn’s compression.
A repeatable 10-minute workflow for perfect LinkedIn profile photo dimensions
A repeatable workflow matters more than one-time advice, because you’ll update your photo again in 2026 or later, and you’ll want the same clean outcome. The goal is simple: a square file that respects linkedin profile photo dimensions, is framed for a circle, and won’t trigger heavy recompression. Do this in order, and stop when the checks pass:
- Pick the best source frame: sharp eyes, neutral expression, and no motion blur.
- Crop to 1:1 and apply the circular safe-area rule (keep key features inside the centered 80% safe zone).
- Resize to your target: 400×400 is a solid default for clarity and consistency.
- Choose format using the matrix: JPEG for most headshots, PNG when edges and flat colors matter.
- Confirm file size is under the limit you verified in LinkedIn Help Center, then upload.
- Check your profile photo on desktop and mobile. If the crop feels tight, fix the crop first, not the file format.
If you’re building a cohesive professional presence, keep your image assets consistent across platforms. A short, practical way to extend this beyond LinkedIn is to use a single “master square” and derive platform sizes from it, keeping your face placement consistent. For a broader reference on dimensions across platforms, this social media image size guide for 2026 helps you keep the same framing logic without guessing.
When you also need transparency or you’re deciding between modern formats for other projects, it’s useful to know where PNG still shines and where newer formats fit better. This breakdown of the best file format for transparent images in 2026 can help you pick the right export outside LinkedIn while keeping your workflow consistent.
Open your current profile photo, check whether it’s square, confirm its pixel size, and compare its file size to what LinkedIn’s Help Center allows today. Then re-export a 400×400 square using the safe-area rule and the JPEG/PNG matrix, upload, and review on both desktop and mobile. Your next update becomes a routine, not a gamble.
If your next step is a practical guide to create a photo collage online for free. follow 5 steps from choosing a layout to downloading a high-quality jpeg or png, How to Create a Photo Collage Online for Free (Simple Guide) is a dedicated option for that workflow.
FAQ
What are the best LinkedIn profile photo dimensions for a sharp headshot?
A square export at 400×400 pixels is a reliable target for clarity across devices. Frame your face for a circular crop so key features stay inside the visible circle.
Should you use PNG or JPEG for a LinkedIn profile photo?
Use JPEG for most photographic headshots because it keeps file sizes smaller at good quality. Use PNG when you need cleaner edges or flat backgrounds and the file still stays under LinkedIn’s maximum size limit.
Why does your LinkedIn profile photo look blurry even when the original is high resolution?
LinkedIn may recompress or resize large uploads, which can soften detail. Export a square at your target size and re-upload so you control the resize and compression.
How do you avoid your face getting clipped by LinkedIn’s circular crop?
Keep eyes, chin, and hairline inside a centered safe zone and leave margin around the edges of the square. Preview your crop as a circle before uploading, then adjust the square framing rather than relying on LinkedIn’s automatic crop.
Crop images into a circle for free